Posts

Showing posts with the label sewing

Disney Princess Half Marathon 2013: Part 1…Cinderella Running Costume

Image
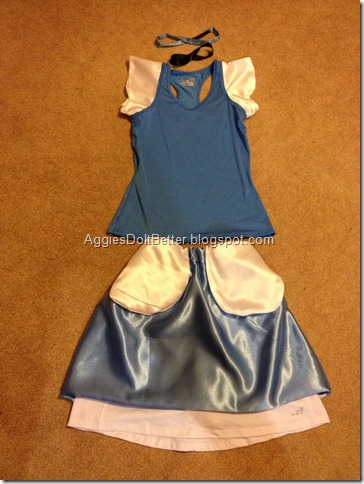
Hi 2014 runners! I've updated the format on this post...wow I had no idea it was so wonky! sorry! This will be a loooooose tutorial on how I made my costume. I decided to just embelish some regular running clothes, instead of running in full costume. There were TONS of people running in full costumes, but I thought this might be more comfortable.  materials This is what I started with: I purchased at Academy a blue tech tank top and inexpensive white tennis skirt. If you already have these things, then you are ahead of the game! This tennis skirt was $14 (running skirts are upwards of $60!) and the Under Armor tank was $30 I think. A splurge, but something I will get tons of use out of in the future. Then I went to the fabric store and got some costume satin. This kind had a little bit of glitter in it. And it was super cheap. I picked the closest blue I could find to my tank top. I just kind of wrapped the bolt around me to see how much I would need for a skirt. I thin...

Disney Princess Half Marathon: My costume (a preview)

Image
Another update: To see how the finished product turned out, CLICK HERE!!! Update: It's finished! It turned out pretty good! Buuuuuut..... I think I have decided not to post pics of it until AFTER the race. I want it to be original! Don't worry, I've taken several pics of the process so that when I get time, if there's interest, I'll make a loose instructional post. So, now all I have to do is do a practice run in my costume. It's a good thing we have a treadmill, even though it doesn't work that great. Otherwise I'd be gettin  up at zero-dark-thirty to run in the dark so I don't look a fool!!! I am SO above and beyond excited for this race! Entering me in it was my birthday present from my husband. I'm going by myself, which I have mixed feelings about. I'm sure it will be good to get away (for 36 hours) but I wish so hard we all could go. It's on a Sunday morning, and in the middle of school for the boys. I'm flying down Saturda...

Halloween Costumes Wrap-Up

Image
So here are the side-by-sides I was talking about earlier. After this I'll leave Halloween be!! This is the pattern I used: McCall's MP373. I know the pic is tiny, but you can see that it is one pattern with different ears, tails, and other add-ons for a basic jumpsuit. This is the only Garfield costume I could find online. Basically I made the jumpsuit out of orange material, and got some black cut to make the stripes, etc. Then, by using this picture and pictures of the actual cartoon on line, as a guide, I made all the details. the face part I made separately, sewed a back on it and then stuffed it, then hand-sewed the corners to the hood. I hot-glued on all those stripes on the back. I cut out diamonds of the material, then cut those into strips. Here is the picture of the Odie costume. I did sew spots on the sides, evenly, unlike this "Odie", but you can't even see them in any of the pictures! Also, after some debate, I wound up sewing the "tongue...

Happy Halloween!

Image
Well, it's here! I finally finished the boy's Halloween costumes, with a couple days to spare!! Go me!! This is one of the few times, if ever, I will be posting pics of the boys. They make such cute little models. They are thrilled to be wearing them, for the most part, which is a huge relief! Even #2, who, wants to put his on when #1 has his on, and take it off the same way. He wants to be just like his big brother!! Here they are.... straight from their debut at my mom's group Halloween party this am! Garfield and Odie! Next week I'll do a side-by-side with the costumes I made and the ones I found from the internet that I was "inspired" by. I think I came pretty close! And I think my Garfield stripes are better! #1 "Odie" #2 "Garfield"

Project Halloween, Day 6

Image
This past Friday I had a WHOLE naptime (with a 4.5 yo in tow) to work on nothing else but the second costume. Since I already got the pieces cut out last week, I was able to get the front and back panels sewn together WITH zipper (which was MUCH easier to do backwards from the way the instructions said), sleeves on, entire front and back sewn together, measure on said boy, then add elastic. That's as far as I've gotten, but that's a lot for one day! I still have to make the hood, mittens, and shoe cover things for this one, and then all the details. It's pretty boring right now!

Project Halloween, Day 5 (IT'S DONE!)

Image
Well, things are finally coming together. I can't show many pics of today's work, because it's all in the details!! Here's a sneak peak. I'm basically cutting out lots of pieces of contrasting material, then cutting them some more, and going crazy with the glue gun. I'm not sure if that will make the costume "non-machine-washable", but that's ok. I made the decision, after I got started with the glue gun, that I'm so not sewing a bajillion little pieces on! Later on today, after making a run to get some more glue sticks, I was able to FINISH!! I glued the rest of the pieces on, and tacked on the thing that goes on top of the hood. There goes my resolve not to hand-sew anything. I was gonna use velcro, but it wouldn't get all sides. So I just stitched a little around the corners of it so it would stay down. A few other stitches here and there, and wah-la! Finito! Since I beat my goal of having it done by the end of this weekend (the 2-week ...

Project Halloween, Day 4

Image
Today was spent making the mittens and shoe covers. I'm not sure whether these mittens will stay on for more than 2 seconds, and I was on the fence about even making them, but I did anyway. I had to add elastic to these, just like the sleeves. This is the only pic I can show today! I also made the "thing" that's going on top of the hood. It looks pretty good, considering I made it from scraps I had laying around! Next...the dreaded details. I have no idea how I'm gonna do it....time to transform from orange blob to "the thing"! Wish me luck!! p.s.....Even though this is "Day 4", it's been about a week and a half since I started. But I don't get to work on it every day..sometimes just a little in the afternoon or evening! So these "days" are what I got done during that time period.

Project Halloween, Day 3

Image
Day 3 was spent sewing the front and back together. Now can hang it on a hangar! And it looks like an outfit! Yay! Then I started adding the elastic. Oh, and I had to try it on the boy it's going on and measure how much to take up on the sleeves and legs. THAT was really cute. I wish I had gotten a pic. Then I sewed casings for the elastic and fed it through. eeeee! It's sooo cute!! Then I made the hood that goes with it. This is the part that needs the most work, since I have to create something to go on top of it that will "be" the thing that the costume represents. Plus, I have to add the detailing all over the costume. Making this jumpsuit is the easy part, I think. The detail will be the time consuming part. The part I don't have a pattern for. (I cut off the top of the hood pic so you cant see what's up there!) So, what's left? I have to add velcro to the hood, make the mittens and shoe covers, then start on the detailed stuff. I am undecided if I wi...

Project Halloween, Day 2

Image
Okay, enough procrastinating. Time to start sewing. I sewed the front 2 panels together. Easy enough. Then I had to put the zipper in. It wasn't exactly rocket science, but it took me way longer than it probably should have, partly because I may or may not have sewn over the teeth of the zipper on one side and had to rip it out and start over. I am so not sewing on the side of the panel where I can't see the zipper on the next one. I don't care what the instructions say. Then the two front sleeve halfs on. (Sorry about the swiffer in the pic...I guess I coulda cropped that out...) Except, there's something on the back that needs to be stuffed before sewing into the back. Hmm, the pattern instructions did NOT say that I need fiber fill (it's like the cottony stuff that goes in pillows). Dammit. I can't continue on this roll with out this step. I am so not in the mood to drive 30 min to the sewing store to get some. Then, my wonderful genius of a husband suggested...

Project Halloween, Day 1

Image
I finally took the dive and started on the costumes. Well, one of them. First things first: read the instructions. Read them again. And again. Check, check, check. Next: lay out sheets upon sheets of pattern pieces on microscopically thin tissue paper and cut them out. Time: 45 min. Third: lay out pieces exactly as mapped out in instructions so as to maximize your fabric. Except, mine was wider than the pic, even though I had 60" fabric and used that guideline. So I had a little leeway. 2.5 hours in, I have a billion oddly shaped pieces of fabric and tissue paper. Yes, 2.5 hours of cutting out stuff. I don't know how long it's supposed to take you, but that's my time. At least I can skip that step for the next costume since I'm using the same pattern. That's good for today. And? Happy 3 month Blog-iversary to me! I finally qualify to have my blog listed on the most awesome place to find other "mommy" blogs...I can't believe I only found it recent...

My OTHER new project...

Image
Monday morning, I went to one of my favorite stores, Joann Fabric. If you've never been to one, stop what you are doing and go now. I'll wait. Not only do they have the best selection of baking stuff of all the "craft" stores here, and it's very well lit and cheery, and the Ladies that work there are awesome, but they have everykind of sewing thing you could ever need. Usually I'm in there looking at baking stuff, but not this time. Boo. I had to get the fabric and other accoutrement that I need to make the boys Halloween costumes. I am going out on a limb and assuming I'll be able to do this. I mean, I can sew a pillowcase and a bag, how hard can it be? I've never sewn anything from a pattern before, but I remember seeing my mom do it alot when I was young. That counts, right? Also, to make things even more complicated, there's not an exact pattern for the costumes I want to make. Which means, I have to find something as similar as I can, and alon...

A few quick updates...

Image
Well, I got all excited about taking my critters to the Fire Department and now it seems like they are not taking any more :( I mean, that's good because they have so many, but now what do I do with mine? I have calls into the Police Department and a local Children's home and am waiting to hear back. Wish me luck! Here's a little update on my sewing project--when I took it in I had to put it on his cover myself like a big nerd. The teacher came over and was all, did you make that? And I was like, yeah, it's not exactly perfect but I did it! and she was all oh....I can't sew. But I'm going to silently judge your crazy crooked sewing and wonder why you didn't get a professional to do it. Ok, well, maybe not that last part. I'm a little critical of myself sometimes! Then the teacher shoved it in the "Wall Of Nap Mats". I snapped a quick pic of it on my phone like a BIGGER nerd. I really wanted to get a pic of my cover on my mat but I didn't...

Pretty Little Bag

Image
Since I'm using this blog to showcase all my skillz , I just wanted to show yall this. I made this little bag for a sweet baby girl's first birthday. You know, since I did have the sewing machine out and all. (Some would argue I'm not the best about putting things up when I'm done with them.) I knew I wanted to make something for this little girl, especially since her mom is pretty crafty too and thought she'd appreciate it! Plus, an opportunity to make something girly and frilly? YES! Some of my boys' favorite toys are things they can put other things in. Like backpacks, bags, suitcases, wagons, etc. They will dump out one toy bin just to fill it up with something else. This bag turned out a little bigger than I originally planned,but that's ok, maybe it can grow with her! It's about the size of a Dr. Seuss book. It turned out pretty good considering I didn't use a pattern! And it only took me ONE NIGHT!! I also wanted to bling-it-up a little more...

Look Out Martha, I'm Coming for you (Part two)

Image
Here's a pic of my workstation: My kid's little tykes table that is set up in my room for #1 to entertain himself when I need to be in there doing stuff. The table just to the right of that is my "Craft" table/area, which is clearly in need of some attention. It has never really been unpacked since we moved and this little project popped up out of nowhere. I was sitting in a grown-up sized chair, so at the end of the day, I had myself a pretty good little backache. So, here is the finished product! (sorry for the low light photos) A pillow and pillowcase (which, yes, could be a little smaller but we may want to put a bigger pillow in it someday so I'm gonna leave it), Mat cover with velcro enclosure at bottom, and matching blankie. Here's an extra picture of the velcro strips sewn on because I'm that proud of my self for it :) The blanket Domestic Goddess Status: Achieved!