Wednesday, January 28, 2015

Picture Polish Paris and a video tutorial for gold chevrons!

Hey guys! Today I have a swatch which turned into a mani I have been wearing for like 6-7 days! I have just been so busy with other stuff around the house that my nail list is growing and growing and growing.....

I bought Paris from Picture Polish for the bottle. I mean, look at it! LOOK! They recently released this and another called "Moscow" that have these city scapes on them. How amazing it it! The color of Paris is more in the coral-pink family, which I don't usually go for. But I had to give it a shot! When I was taking pictures all my camera saw was RED and this is definitely not a red polish, so I had to turn down the red level in the pics a little. I try really hard not to edit my pics too much (or at all) but sometimes, I'm finding, it's necessary. As a result my skin looks a little gray but that's ok ;)


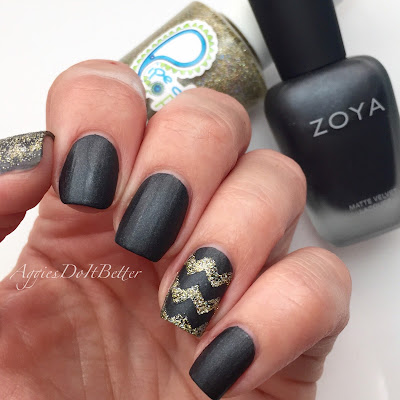
After a couple days, as always, I feel the need to add. Paris has a gold holo micro shimmer running through it so Zoya Tomoko was a natural choice!


I made a little tutorial video for this mani, which almost was lost forever on my phone! We've all seen chevron tutorials a million times, but you still need to see this for the song I used...Paris by Faith Hill. One of my favorite Faith songs EVER and I don't think it was ever released as a single? It's off the Fireflies cd and its one of the best ones she made, and the last good one in my opinion. Please click here for the video!

I mean guys. Look at this bottle. I just want to frame it!


Tuesday, January 27, 2015

Valentines Day nails with nude and RED!

Hey guys! It's good to be back! If you follow me on Instagram you know about my drama this weekend. I won't go into it here but I might blog about it this week! (Phone drama, yall know.)

Anyway, this is a look I came up with last week! It's hard to come up with new looks for Valentine's Day, even I just want to stick with hearts ;) And, I have lots of vinyls but the ones I have trouble using the most are the lightning bolt ones, because I feel like they can only really be used one way. So I forced myself to try to think out side of the box! I don't know, what do yall think?


I started with a nude base (this polish may or may not be blogged, that's all I'll say about that, wink face) and used Lightning bolt vinyls from Glam my Mani (sent to me, I've used them many times before!) and my fine red Zoya PixieDust in Chyna. Go super slow, if Chyna gets on your cuticles she will not come off!

For my ring finger I used a heart vinyl stencil, also from Glam my Mani and my "chunkier" red Pixiedust in Oswin. I just filled it in and then used a dotting tool to add more where necessary after I removed the vinyl, which you can see in the video! On my pinky I wore 2 coats of Oswin.

Oswin and Chyna are pretty much the same color but with different texture, yall know how much I like to add dimension to  manicures and these do that job nicely!


Click here for video tutorial!


PSA: Zoya is discontinuing all Pixie Dusts so If you don't have any yet I highly recommend getting some! Chyna is one of my favorites, its really good for Christmas and Valentines Day! (and I purchased it myself :)

Thursday, January 22, 2015

Nicole by OPI Roughles from Spring 2014, swatches and review

Hey guys! As promised here are my official swatches of last year's Nicole by OPI Roughles! I love these all and you will be seeing them a lot on me this spring!


First up is "Rock the Look" which is pink with darker pink/red flecks. I used 2 coats on all these swatches so I'll just state that here. To see the look I created with this one click here.

Rock the Look

Next up is "On What Grounds?" Which is probably my favorite! It's a minty-teal color with flecks of darker blue. Totally reminds me of a Robin's egg! Too see the look I created with it click here.

On What Grounds?
Next is "Sand in My Shoe" which is yellow with flecks of red and orange throughout. This one is interesting and not many people love it. I do and found a way to make it work! Too see click here!

Sand in my Shoe
Lastly is "I'm Stucco On You" which is lilac purple with flecks of dark blue. Too see the way I used it in a mix and match mani click here.
I'm Stucco on You
So, I totally love these! And I'm kicking myself for not ordering them lasty year. Some people are still seeing these in Kmart stores but I don't have one anymore here and even before it closed they never had these. The pink and teal ones were gifts for me and found on StoreEnvy, and the yellow and purple I purchased myself on Aveyou.com! I don't get any bonus for mentioning that, I just want to let yall know that they are still out there if you want them! Thanks guys!

Purple striped nails with nail vinyl tutorial

Hey guys! I'm in purple today! I have a lot of purples, I don't know why I don't wear them that often. I used to really love purple! I have this on now and have since Monday? I have realized this is the longest I think I have ever worn purple!

Really, this mani wasn't on my to-do list (yes, I have one haha) but came as an excuse to use my new Nicole by OPI Roughles ;)


The glittery solid purple is Pipe Dream Electric Soul, and was my first Pipe Dream Polish! The white glitter is Pipe Dream Bundled up, which is from a special box of polishes that hopefully I will have a blog up soon about. And the purple texture is Nicole by OPI I'm Stucco on You!


CLICK HERE FOR VIDEO TUTORIAL! I made another video showing how I used nail vinyls to achiever the stripes! Its totally easy! Please check it out and let me know what yall think!


By the numbers:
Pipe Dream Electric Soul: 3 coats
Pipe Dream Bundled Up: 3 coats
NOPI I'm Stucco on You: 2 coats, no topcoat.


Wednesday, January 21, 2015

Orange and yellow mix and match mani (yep, write it down. I wore orange.)

Hey guys! I have another mix and match mani today. And, write this down: I wore orange. It is a well known fact I do NOT like orange. I mean, it has it's place for art and what not and such, but that's about it. This is by far the most orange I've ever worn at one time. And no, this was not a full mani, just a look I created playing with  my new Nicole by OPI Roughles (swatches coming soon!) And, I used 3 untried polishes for this! Yay! It may be hard to believe but I have (um) several untried OPI's that I've collected over the months from clearance sales etc. But so far this month I'm doing pretty good plowing through them and my new polishes from the holidays! Onward!

Click read more  for more pics and polishes used!


Tuesday, January 20, 2015

Valentine's Day nails! Already? Yes! Plus OPI Mod About You

Hey guys! Today I have another "spruced up" look that turned into Valentinesy nails! The base color is OPI Mod About You, which I have pics of at the end of this post. I wore it with a matte topcoat, which I really loved!!

After I wore it for a couple days I wanted to add something before I took I off. I don't love the single chevron look, so I had make myself use them! I'm happy with the way it turned out!

Click Read More to see more pics and 2 video tutorials!


Thursday, January 15, 2015

Orly Mind's Eye and Digital Glitter plus easy sponging technique!

Hey guys! Today I have a simple swatch and and an easy tutorial. I am really trying hard to get through and try my untried, and one brand I have many of is Orly! I'm not sure why, I really do like Orly. I don't have that many, and most of them I've picked up on clearance at Sally. And then I never get around to using them!

This one I picked up out of the clearance bin a couple months ago. I think it was one of the core colors that were being discontinued. It's called Mind's Eye, and its obvious why I chose it! Maroon, hello! This swatch is 2 coats, the formula was a little thin. I knew I was going to put glitter over it so I didn't use 3 but if I wear it again on its own I definitely would!

I decided to put another one of my unused Orly glitters on just 2 fingers.  I used a sponging technique, where all you basically do is apply the polish to a makeup sponge to absorb the clear base and you get maximum glitter on the nail. This is a good technique to use with glitter toppers like this which are heavy on the base and light on the glitter. You can see in the video how I applied the glitter and then did one final brush over the whole nail with the brush. I the added topcoat to all the nails, and the plain nails did wind up looking ok with just the 2 coats of Mind's Eye. But I still would do 3 when I wear it alone again.

Here's the link! The video loader is still not working for me grrrrrr

The glitter I used is called Digital Glitter, shown in the pic below.

I am in a big matte phase lately! So of course the Matte Fairy told me to try these matte and I really love it more. Despite the White Speck of Death that I get with my matte coats lately. I used OPI Matte topcoat.

Here's a couple more pointless pics because I'm just playing around with different poses!


Tuesday, January 13, 2015

Picture Polish Fool's Gold

Hey guys! Today I have a review of the polish I wore most of last week and through the weekend! This is Picture Polish Fool's Gold, one of the newer collab polishes they have  by one of my favorite bloggers Sammy from The Nailasaurus! This is polish is absolute perfection in a bottle, as soon as it existed I knew I had to have it! This was a Christmas gift from a friend and I'm overjoyed about it all, haha :)


I found it to be opaque enough for me in 2 coats, which was surprising because I thought I'd need 3! Like all polishes with this type of crelly formula they dry a little dull so you do need a topcoat.


The sun was actually out a tiny bit the day I put this on so I went outside for some pics in different lighting!


I just. Yall know. I mean. GAH.


After wearing this for an almost record breaking 6 days, I wanted to spruce it up a little for the last day! This is a trick I often do to get a little more mileage out of a mani. Just a little tape or some nail vinyls and a textured polish (it hides unevenness in your base color from chips, etc better than a crème) and there you go!


I filmed the process also! The straight strips are nail vinyls and the bow is made from paper punch I got a craft store for 99 cents! I just used blue painter's tape to make the stencil. Easy!

Click here for the video! (The YouTube uploader isn't wanting to load for me so there's just a link for now. I will come back and try again later!)

Here's a closer look at what the punch looks like.


Monday, January 12, 2015

Teal Mix and Match mani featuring Pipe Dream Polish Frozen Over


Hey guys! I have another mix and match mani today...I told you I was going to be doing these a lot!
Teal and turquoise are still my favorite colors lately. I just can not get enough!

On my index, ring, and pinky fingers is OPI Fly, one of my favs. But DANG yall she's a stainer. I would wear it more if it wasn't! Even with a base coat it still stains a little. I had to redo my ring finger and didn't use a basecoat. My nail was green when it took it off :( However, a little scrub with my nail brush and whitening toothpaste and most of it came off. But still!
My thumb and middle finger is Nicole by OPI On What Grounds? Which is another one of the "Roughles" I received for Christmas. I seriously love it! Full review coming!

For the silver dots I used Island Girl Tropical Hawaii and a dotting tool. Easy! But it wound up looking kind of loud so I put a matte topcoat over it and it helped tone it down.

The glitter on my ring and pinky is Pipe Dream Polish Frozen Over. I've had this for a couple months and am just now getting to it! I just love it-the colors in the glitter are teal and silver. I mean. UGH love.


Overall aside from the staining I was super happy with this look! I am still having to photograph inside 100% of the time but I'm finally getting the hang of it and not hating my pictures, so that's progress, right?!


Friday, January 9, 2015

Aqua and coral birthday nails for Danele! (And my blog anniversary!)

Hey guys! Today is my 1 year blogrelaunchiversary!! Basically that just means that one year ago after being in blog limbo for a year (this was a cooking/crafting/running/general mish mash blog years ago) I decided to relaunch and feature nails, swatches, tutorials and art! I hoped I would be where I am now but didn't think it would happen as quickly as it did! Thanks to everyone who has left encouraging comments and supported me along the way! I can't wait to see what this year has in store!

Coincidentally one of the amazing girls I've gotten to know through all this as a birthday today! So our little group decided to do a little tribute. Aqua and coral are some of her favorite colors :)
 More after the break!


Thursday, January 8, 2015

My Christmas and NYE manis for 2014


Hey guys! Todays blog is just a little round up of the nails I wore over the past few weeks. With the craziness of the boys being out of school and traveling I didn't have any time to blog, but now I want to get them up! :)


Add caption


This was my official Christmas mani. December was so crazy that I missed out on a whole season (and my favorite season) of holiday nails. Super sad! :( I didn't even get a chance to do my nails before we left for our road trip to Texas.  I packed a ton of polish and only wound up using 2 bottles and one time! Funny right! I did these in the hotel room bathroom at night when we stopped over in Texarkana. Not terrible lighting, right! LOL! The base is one of my new Picture Polishes called Lakodom (ahhhhhh I just love it. I knew even before I ordered it that I wanted to wear it on Christmas. It just.....called to me. Strange, I know. There will be a blog devoted to it in the very near future because it is just THAT awesome) The dots are made with Pipe Dream Polish Cha-Ching!


Picture Polish Lakodom

These are my New Years Eve nails. Again, only time for one and it had to be quick. I used Zoya matte velvet in Dovima for the base and since it dries so quickly I was able to add a quick chevron nail with Pipe Dream Polish in Champagne Kisses (obviously right!) I sponged a little of the glitter onto my thumbs.


Zoya Dovima
After new years (and I used that mani to practice the stamping) I swapped out again for Zoya Godiva for the next week. This is one of my all time favorite Zoyas!!!!


Zoya Godiva
The sun actually came out  for a few minutes when we were in Texas! It was the only decent pic I could get of these, waiting in the car, haha!


sun!!!!!!!!!!!!!!!!!

Few little bottle shots of my NYE nails. I was really happy with them.


New Years nails


Pipe Dream Polish Champagne Kisses


Wednesday, January 7, 2015

Pink Mix and Match mani with Loaded Lacquer

Hey guys! Today I have a little "mix and match" mani trying out a few of my new polishes! You guys are gonna see a lot more of these from me in the coming weeks because its a great way to try several polishes at once and it gets you out of the box!

The pink glitter on my first 2 fingers is called "Freezing my Baguettes Off" from Loaded Lacquer.  It's a light pink crelly with darker pink circles, hexes and iridescent white squares. It took 3 thin coats for me to be as opaque as I wanted and as with all milky polishes like this you need a topcoat because they matte down a little as they dry. I again used my new HK Girl topcoat which I will have a review of soon!

The creamy pink is "No Bra" also from Loaded Lacquer. This is a unusally opaque jelly! I only needed 2 coats for full opacity! I also used the same topcoat.

On my pinky and thumb is Nicole by OPI "Rock the Look" which is from the set of 4 "Roughles" polishes they put out last spring. I wanted all of them so bad but never found them anywhere! I received 2 of them from my Secret Santa and now I REALLY want them all. Since they don't have any sparkle in them I didn't know how I would feel, I wanted them simply because I love textures :) But now I love them even more :) Need to start trying to find the missing 2! I will have swatches of the 2 I have coming soon also. I did not use top coat on this polish.


The Loaded Lacquer polishes (well all these I talked about here) were gifts but the LL can be purchased at LoadedLacquer.com! She is on vacation at the moment I think so her store is closed, but will reopen soon! I love all of the ones I have and need more!! What do you guys think of this look?


Monday, January 5, 2015

Kb Shimmer -my little collection of swatches :)

Hey guys-I have some swatches today! I got 2 new KB Shimmer's from my Secret Santa Swap, plus one I've had for months and was waiting for December to wear...then I was never able to wear it! Boo! I was so not waiting another year so I took the opportunity to try them all out. :)

First up is Snow Way! , which was on my wish list for a while! This is 2 coats, it's a light sky blue with variouos sizes of white matte hex glitter. I mean. It's perfection. I love it so so much.


Next is Kringle All The Way, which is from her 2013 holiday collection. It's red, green, gold and silver circle glitter in a clear base. I brushed on one thin coat then dabbed a little extra to get the larger pieces of glitters on there, then topped with clear top coat to even it all out. The black base is OPI Queen of the Road. Man, I love this so much also!


Lastly is Up and Cunning, from this year's holiday collection  (along with Snow Way). This one practically needs no words. Its a teal holo cream with a strong blue shift. I believe it's listed as emerald green but on me it pulls strongly teal. I'm not as much into holos as mannnny people BUT I have room in my heart for a few really really really special ones :) I wish I could have gotten a sun pic of this but we are in the middle of a never ending gray winter here so there is no sun to be found.