Thursday, October 30, 2014
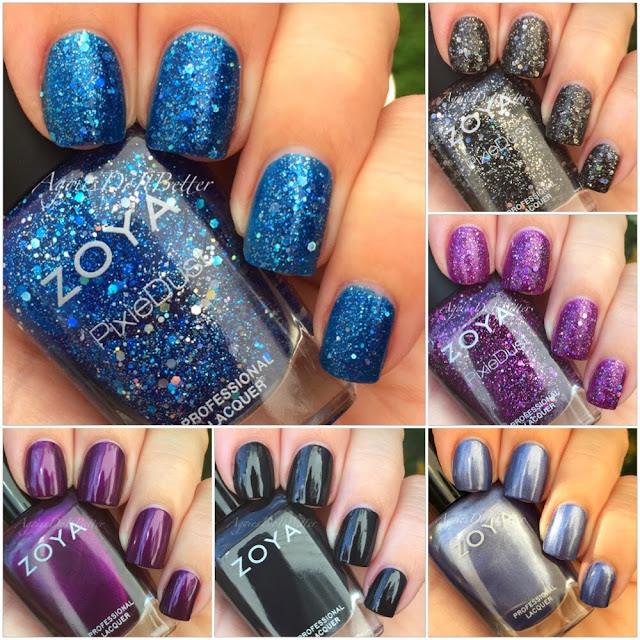
Zoya Wishes Holiday/Winter Collection 2014 Swatches and Review
Hey guys! Taking a little break from the Halloween stuff to bring you Zoya's new Holiday/Winter collection for 2014 called "Wishes"! Click Read more after the collage for my thoughts and a TON of pics! I have also included several comparison pics.
Wednesday, October 29, 2014
Rapunzel-Inspired nails using Zoya Mattes, plus a taped tutorial
Hey guys! (I start every blog like that, don't I?) Today I have something a little different. When I swatched the new, re-released Zoya Matte Velvet collection, which you can see here! I was completely amazed at how fast they dried. Like, amazed. For some it can be an issue because if you go over the same spot twice it can cause the polish to drag a little, but if you work quick enough you won't have that problem. Shortly after I swatched them and then wore Harlow for the rest of the week (for a wear test, post on that coming soon!) I had an idea. What if I could film a real-time video showing how fast they dry and how quickly you can tape over them to create a cute design? Thus my Rapunzel inspired mani was born!
A few more things about this since I don't talk in my videos....yet. :)
-I started my stopwatch at the beginning, with bare nails. I did not stop it until I was done.
-I only did 4 nails for this tutorial. My total time was 18 minutes. I think if you did all 10 of your nails you could easily do it in 20 minutes.
-I waited 3 MINUTES after the 2nd coat to apply the striping tape. 3 minutes! Lay the tape down, paint over, and remove immediately. Do one nail at a time.
-I filmed this in real time. You can even see me fumbling with my running watch to try to prop it during the 3 minutes so I wouldn't have to hold it, haha! It is sped up slightly so that no one has to watch an 18 min long video, but I didn't remove any content.
-Some of the taping, especially the cross hatched nail, occurred off camera because I can not fit both my hands under my phone to film the way I apply tape until I get a tripod! BUT I did not stop the timer!!
I added some China Glaze Fairy Dust to it but didn't wind up liking it like I thought.
Obligatory blurry shot to show sparkles :)
Here is a still shot that is inserted into the video, Just to show how I cut multiple pieces of striping tape at a time. Pull them out together and cut with scissors.
Always, always, ALWAYS separate and place your tape pieces with in reach before you start. ALWAYS!
(Hi, foot.)
-I started my stopwatch at the beginning, with bare nails. I did not stop it until I was done.
-I only did 4 nails for this tutorial. My total time was 18 minutes. I think if you did all 10 of your nails you could easily do it in 20 minutes.
-I waited 3 MINUTES after the 2nd coat to apply the striping tape. 3 minutes! Lay the tape down, paint over, and remove immediately. Do one nail at a time.
-I filmed this in real time. You can even see me fumbling with my running watch to try to prop it during the 3 minutes so I wouldn't have to hold it, haha! It is sped up slightly so that no one has to watch an 18 min long video, but I didn't remove any content.
-Some of the taping, especially the cross hatched nail, occurred off camera because I can not fit both my hands under my phone to film the way I apply tape until I get a tripod! BUT I did not stop the timer!!
I added some China Glaze Fairy Dust to it but didn't wind up liking it like I thought.
(Hi, foot.)
Labels:
disney,
disney nails,
nails,
tape mani,
tape nails,
video tutorial,
Zoya
Tuesday, October 28, 2014
Frankenstein's Monster and His Bride nails featured in Nail It!
Hey guys! I have another Halloween mani for ya! This one has a funny story.... I did it back in June! It is featured in the current issue of Nail It! magazine, and the prompts for entries are so far in advance I had to do this in the middle of summer! These are also a "then and now" (yall know I love a good then and now, haha!) because I did this design 2 years ago, right when I first got into nails and nail art! This was seriously like 3 weeks in, maybe less, into starting to paint my nails. I pulled that pic off my Pinterest page and it's at the bottom!
purple: OPI Vant to Bite My Neck
green: Zoya Tilda
black: OPI Black Onyx
white: OPI Alpine Snow
This is the pic that is featured in the magazine!
andddddd here you go! I really believe in showing things that I might not love or be super embarrassed of because it shows how far you can come! I'm pretty sure I don't own any of these polishes any more. Most of them were probably NYC brand because that's what I bought a ton of in the beginning. These aren't too terrible, right? I definitely did worse back then!
Monday, October 27, 2014
Candy Corn Watermarble nails for Halloween
Happy Halloween week! I don't have as many mani's as I wanted as of right now for Halloween, I don't know if I will have one every day this week or not! I'm not much of a Halloween girl past the cute kids/cute costumes/candy. I'm a Christmas girl! Come on Santa!
Anyway, haha! This was one of the few on my list I have actually made a reality. I tried a few other ones and hated them :( I'm super happy with the way it turned out!
The black is Zoya Dovima, the black matte of the new matte polishes, which I reviewed here
The watermarble is 3 colors:
white: Zoya Purity
orange: Nicole by OPI Fairy Fairy Quite Contrary (the ONLY true orange I have!)
yellow: Zoya Darcy
The pic below is the matted watermarble look. I topped it first with Seche vite, then when it was dry I used the Zoya matte topcoat. I thought the matte more matched the chalky look of candy corn!
Here is what it looked like with the glossy coat.
here is a quick video of the watermarble! I could just watch watermarble videos all day!
Anyway, haha! This was one of the few on my list I have actually made a reality. I tried a few other ones and hated them :( I'm super happy with the way it turned out!
The black is Zoya Dovima, the black matte of the new matte polishes, which I reviewed here
The watermarble is 3 colors:
white: Zoya Purity
orange: Nicole by OPI Fairy Fairy Quite Contrary (the ONLY true orange I have!)
yellow: Zoya Darcy
The pic below is the matted watermarble look. I topped it first with Seche vite, then when it was dry I used the Zoya matte topcoat. I thought the matte more matched the chalky look of candy corn!
here is a quick video of the watermarble! I could just watch watermarble videos all day!
Saturday, October 25, 2014
Pink Dry Brush mani!
Hey guys! I finally got a pink mani in for October! This is a super simple dry brush, one of my fav methods to do on all fingers because it's so fast and easy! Usually if I have some sort of taped design on my left hand my right hand is almost always plain. But this I am wearing for the weekend on all 10 nails! Whaaaaatttt!!!
I apologize for the weird lighting, in the afternoons here the sun is already behind the trees so I'm trying to figure out a good spot to take my pics outside. There is only direct sun in the am here anymore, and I don't have time to do nails in the mornings mostly!
Here is little video of how you do this! I've done a pictorial of this before but never a video. Basically you just start with your base color, I only did one coat because it will be covered, and Rooney is opaque enough to be ok at one coat. Then you take your accent color and scrape off as much as possible off the brush and do light strokes in both directions until you get the desired look. I would recommend being a little more careful if you use a sparkly polish like I did to not get it on your skin! I had a heck of a time getting if off and still haven't gotten it all off!
The polishes I used are all Zoya:
from left,
base: Rooney
lighter pink: Kitridge
white: Purity
pink gitter: Harper
polished used |
Here is little video of how you do this! I've done a pictorial of this before but never a video. Basically you just start with your base color, I only did one coat because it will be covered, and Rooney is opaque enough to be ok at one coat. Then you take your accent color and scrape off as much as possible off the brush and do light strokes in both directions until you get the desired look. I would recommend being a little more careful if you use a sparkly polish like I did to not get it on your skin! I had a heck of a time getting if off and still haven't gotten it all off!
Friday, October 24, 2014
China Glaze Apocalypse of Colour Collection for Halloween 2014 Swatches and Review
Hey Guys! Happy Friday and one week till Halloween! Who out there loves Halloween and who can't wait until Christmas???? (-------->This girl!) Here are the things I like about Halloween: Candy Corn, cute kids in cute costumes, carving pumpkins, candy, candy. Here are things I don't like about Halloween: zombies, gore, all things gross! haha! But I can handle gross things in nail polish form!! How excited am I to bring you the China Glaze Apocalypse of Colour Collection, their Halloween collection for 2014, provided by China Glaze! The collection is "zombie" themed....not my fav...but I'm gonna make it my mission to find other ways to use these in the very near future so stay tuned! Click Read More after the collage to see the swatches!
China Glaze Apocalypse of Colour 2014 |
Thursday, October 23, 2014
Scratch Nail Wraps Review!
Hey guys! Today I have a review of some super cute nail wraps Scratch sent me! I feel like I've had these forever, they came right in the middle of when the Mr. was traveling a lot! But I finally have the up! These are the second nail wraps I've reviewed and my thoughts on these are quite different than the first!
Click Read More after the collage!
"Total Flake" Scratch Wraps Review |
Friday, October 17, 2014
31DC2014 Inspired by a Pattern plus Glam my Mani nail vinyl review!
Hey guys! Another review for you! I'm still trying to get caught up on reviews AND the 31 Day Challenge! I promised I would try to get through the rest by the end of October...we shall see!
These serve as my "Inspired by a Pattern" nails, click Read More to see my review of the vinyls I used and for the inspiration!
blue on blue chevron :) |
Thursday, October 16, 2014
Birthday Nails with Picture Polish Frosting!
Hey Guys! I will keep this short and sweet because I feel like I've been super wordy lately! Today is my birthday! It was a no brainer what to do on my nails....this is my special Birthday polish. Frosting from Picture Polish. It was my gift to myself last year and my first PP! I remember having the intention, I'm gonna buy one of these for myself every year on my birthday. Wasn't that cute? ;) HaHa!
I wanted to change it up a little and do some colorblocking on one nail with coordinating colors to the glitters in Frosting. For the blocked nail I used all PP polishes also:
base: Beige
pink: Fairy Floss
Pink sparkles: Shocked
Purple sparkles: Shy Violet
Frosting.
Frosting was not so easy dealing with in such small areas but I made it work! I am super happy with them! .......Although, I kind of feel like Frosting might no be so age appropriate...what do yall think? I still love it anyway!
I was also hoping the sun would peek out for a few minutes for a decent picture but no such luck. 7th day in a row with rain/overcast/clouds/grayness here! BOO!
I probably should have reduced the white balance on this pic but I try not to edit my pictures too much, at all really. Sorry it looks a little washed out!
Here's a fun little look at the other 2 times I've ever worn Frosting! Like I said, I ordered it for my birthday last year but I didn't get here until a few days later and I put it on right away! Clearly that was before I started paying attention to nail shape! Yikes! :/ Then again I wore it in January...pretty happy with those but I was still struggling with a good way to hold these square bottles! Luckily I worked out a better way this past August. I pretty much devoted a whole day for it :)
Lastly, Look what my nail buddies did for me! I was so surprised! They all secretly conspired and did blue manis with cupcakes. They know me so well! They were probably surprised to see me not wearing blue today, haha! Please go check them out!
Danele @LowCountryLacquer and Low Country Lacquer Blog
Aly @Alygaterr
Marcella @LovePurplePolish
I just love these ladies and I'm so grateful we found eachother!!
I wanted to change it up a little and do some colorblocking on one nail with coordinating colors to the glitters in Frosting. For the blocked nail I used all PP polishes also:
base: Beige
pink: Fairy Floss
Pink sparkles: Shocked
Purple sparkles: Shy Violet
Frosting.
Frosting was not so easy dealing with in such small areas but I made it work! I am super happy with them! .......Although, I kind of feel like Frosting might no be so age appropriate...what do yall think? I still love it anyway!
I was also hoping the sun would peek out for a few minutes for a decent picture but no such luck. 7th day in a row with rain/overcast/clouds/grayness here! BOO!
cloudy day :( |
I probably should have reduced the white balance on this pic but I try not to edit my pictures too much, at all really. Sorry it looks a little washed out!
cloudy lighting |
still a work in progress! |
Lastly, Look what my nail buddies did for me! I was so surprised! They all secretly conspired and did blue manis with cupcakes. They know me so well! They were probably surprised to see me not wearing blue today, haha! Please go check them out!
Danele @LowCountryLacquer and Low Country Lacquer Blog
Aly @Alygaterr
Marcella @LovePurplePolish
I just love these ladies and I'm so grateful we found eachother!!
aren't they awesome! |
Wednesday, October 15, 2014
Zoya Matte Velvet Collection Re-release for Fall 2014 Swatches and Review!
Hey guys! Busy blogging week continues! Today I have the new, well, re-released, Zoya Matte Velvets!!!! These came out several years ago and were limited edition, and people have been pining for them ever since! Actually, I was literally looking online at Amazon and Ebay like 2 days before I got the press release for these! My jaw hit the ground! And let me tell you ..... They are as awesome as you've heard. The bottles are also different...they have the same matte rubber caps as the Pixiedusts but the bottles are frosty glass instead of regular glass! They just look fancy. I promise this blog is my honest opinion (I gush a lot) even though these were samples sent to my by Zoya!
Click Read More after the collage for my review!
Zoya Matte Velvets |
Monday, October 13, 2014
First Tn Nail Gals Meetup! Plus Fall themed watermarbles plus video!!
Hey guys! Today I have a little recap of the meetup from yesterday PLUS the mani I did plus a little video! Click Read More after the pic for lots moreeeeeeeeeeeeee
indirect sunlight |
Labels:
Nail Art,
nails,
OPI,
pipe dream polish,
pipedream,
watermarble
Friday, October 10, 2014
AGGIE WEEK Day 5 featuring Picture Polish Bonkers and watermarbling!
Hey guys! Boy. Today's mani almost didn't happen! I tried like 7-8 failed attempts at this last week. Several with this polish and then with several other maroons and whites. I was so sad it wasn't working! So I shelved it for a week. Then a couple days ago, I gave it one last try. I sloppily slopped on my white base coat and gave it another whirl (which is why the cuticle area looks not so great.) I gave it another go and it turned out! Yay! Glitter and confetti for all!
This is Picture Polish Bonkers. Another one of my favorite brands and polishes. Ya'll have heard me go on about them before! When this polish came out earlier this year I just had to have it. HAD. It's completely gorgeous, 2 coats, the brush is shorter than OPI but the flat wide brush I so prefer. I wanted to feature this polish with watermarble sooo much I'm so glad it finally worked!
Scroll to the bottom for the link to the video tutorial!
CLICK HERE for the video tutorial! It's not real time but slower than the IG version! Let me know what yall think!!
This is Picture Polish Bonkers. Another one of my favorite brands and polishes. Ya'll have heard me go on about them before! When this polish came out earlier this year I just had to have it. HAD. It's completely gorgeous, 2 coats, the brush is shorter than OPI but the flat wide brush I so prefer. I wanted to feature this polish with watermarble sooo much I'm so glad it finally worked!
Scroll to the bottom for the link to the video tutorial!
sun |
shade |
CLICK HERE for the video tutorial! It's not real time but slower than the IG version! Let me know what yall think!!
Thursday, October 9, 2014
AGGIE WEEK Day 4, featuring OPI Scores a Goal! and chevrons with bonus tutorial!
Hey guys! Today's maroon is OPI Scores a Goal! from this past spring's Brazil Collection (which I'm still madly in love with. The whole thing was just perfection. This polish is a bit darker, kind of a raisiny maroon with out being too vampy. The formula sets is apart because like all the other polishes in that collection, is just amazing. Smooth, buttery, 2 effortless coats. ahhhhhhh
I chose one of my favorite looks, chevron, for the accent here! As with all these looks this week, you could easily do these on all your nails, but I wanted to showcase the maroon polishes so I only did one! And guess what, I have a bonus tutorial for you! There are lots of ways to achieve the chevron look. The most simple is free handing with a thin or striper brush, but ummmmm I'm pretty terrible at that so I don't do it. Ever. When I starting doing chevrons, this is how I did them-I made them my self! There's lots of other options out there, including "nail vinyls" that you can order online. They are basically pre-cut strips in various pattens and you just place them on your nail. I think they all work great, its whatever works best for you! BUT you might already have some of these supplies laying around your house, so they're a good place to start!
I used these craft scissors. They came in a set from a craft store--I think they all pretty much have them! I also used blue painters tape, but you can always also use scotch tape, regular masking tape, or electrical type tape. Try lots of things to see what works for you!
First here is a quick video to show one way to make your own chevron stencils.
And here is how I used those to make this particular chevron accent nail!
CLICK HERE FOR CHEVRON TUTORIAL :) still having a few issues uploading but that's a link!
indirect sun |
I used these craft scissors. They came in a set from a craft store--I think they all pretty much have them! I also used blue painters tape, but you can always also use scotch tape, regular masking tape, or electrical type tape. Try lots of things to see what works for you!
chevron craft scissors |
First here is a quick video to show one way to make your own chevron stencils.
And here is how I used those to make this particular chevron accent nail!
CLICK HERE FOR CHEVRON TUTORIAL :) still having a few issues uploading but that's a link!
Wednesday, October 8, 2014
AGGIE WEEK Day 3, featuring Essie Angora Cardi and Argyle print!
Hey guys! For Day 3, I have one of my fav Essies, Angora Cardi. It's not as bright as the last 2, its more subtle and muted, and probably more work appropriate if you shy away from bright colors! The formula is good, not awesome, and it's super thick. Mine could actually stand to be thinned down a little. But it such a gorgeous color!
For the accent, I used a base of Essie Sand Tropez, which was one of the first nude-type colored polishes I ever owned, and I still love it! The white is just a Kiss brand White striper I picked up at a store! I've seen them everywhere by now. Check out the video for the tutorial...and try not to laugh too much at my freehand skills!
click here for the video tutorial! Its longer! For some reason I'm not able to upload it here like before, it's not coming up on my list of videos to choose from. Grrr. Still learning! But it's a longer version at least!
Dusty shades like this plus such a fall print like argyle had me rushing to put a matte topcoat on it. I love it this way too!
For the accent, I used a base of Essie Sand Tropez, which was one of the first nude-type colored polishes I ever owned, and I still love it! The white is just a Kiss brand White striper I picked up at a store! I've seen them everywhere by now. Check out the video for the tutorial...and try not to laugh too much at my freehand skills!
indirect sunlight |
click here for the video tutorial! Its longer! For some reason I'm not able to upload it here like before, it's not coming up on my list of videos to choose from. Grrr. Still learning! But it's a longer version at least!
Dusty shades like this plus such a fall print like argyle had me rushing to put a matte topcoat on it. I love it this way too!
matte |
Monday, October 6, 2014
Little Big Town Event from October with Zoya Vega and Cosmo!
Hey guys! These were my nails I wore for a super awesome Little Big Town event I got to go to with my husband back in October! I've had this post in the drafts for a while, I keep forgetting to post it and I really wanted to share the pics!
My nails were simple...Zoya Vega (blue) and Cosmo (gold) both Magical Pixie Dusts, the earlier formulas that actually dry matte and super sparkly. Oh how I wish the darker blue one that just came out was like Vega! Ah well.
So we were invited to a private event to hear Little Big Town perform their entire new album live! I don't love many of the newer country artists lately but I LOVE LBT. And this was amazing and so fun!!!
They had a signature drink for the evening in addition to other drinks, called the "Painkiller" like the album. I don't remember what all was in it but it had pineapple juice in it and rum? It tasted like a mai tai to me and I was A-OK with that ;)
The venue it was at is called War Memorial, was really beautiful!
My nails were simple...Zoya Vega (blue) and Cosmo (gold) both Magical Pixie Dusts, the earlier formulas that actually dry matte and super sparkly. Oh how I wish the darker blue one that just came out was like Vega! Ah well.
AGGIE WEEK! Day 1, featuring Zoya Toni and polka dots!
Hey guys! I'm so excited for this! These posts have been months in the making....I just haven't had time to do it the way I wanted to, the right way! My goal: to showcase my absolute favorite maroon polishes, that I have currently, as well as create some cute, easy to do looks for game days or any Aggie function! Some are easier than others, but I think you will find some on every skill level!
I am also keeping the accents to just one nail, because I want to showcase the polish as well. But you could absolutely do it on every nail!
I'm sure I will probably be saying this every day, but this one is probably my favorite. Zoya Toni. I don't think its part of the core collection but its available on their website, and they are always having promos. It retails for $9, but if you catch the promos there's really no reason to ever pay more than $5 for Zoyas! Toni wins for color and FORMULA. Guys, it's just a dream. It could EASILY be a one coater, although I use 2 for durability. I have had no issues with staining either after removal, and I try really hard to not get any on my skin during application!
For the accent I used a base of Zoya Dove, a really pretty light gray, and Zoya Purity for the white.
Here is the sped up Instagram version of the video tutorial for the dot nail! I used a dotting tool (my dotting tools are actually embossing tools I got at Michaels or Hobby Lobby or some such) but dotting tools are widely available online or at Sally's. Or you can get creative with things from the craft store like I did OR you can use things around the house like tooth pics, pins, bobby pins, pencils (sharpened) or whatever! To make the dots, just blob some polish from the brush onto something like a plastic lid or something non-absorbant. Use the dotting tool to tab in the blob (so scientific right!) and then dot on your nails. If it starts to get stringy just wipe the tool on a cloth or paper towel and have another go.
I am also keeping the accents to just one nail, because I want to showcase the polish as well. But you could absolutely do it on every nail!
I'm sure I will probably be saying this every day, but this one is probably my favorite. Zoya Toni. I don't think its part of the core collection but its available on their website, and they are always having promos. It retails for $9, but if you catch the promos there's really no reason to ever pay more than $5 for Zoyas! Toni wins for color and FORMULA. Guys, it's just a dream. It could EASILY be a one coater, although I use 2 for durability. I have had no issues with staining either after removal, and I try really hard to not get any on my skin during application!
For the accent I used a base of Zoya Dove, a really pretty light gray, and Zoya Purity for the white.
sun |
shade |
Here is the sped up Instagram version of the video tutorial for the dot nail! I used a dotting tool (my dotting tools are actually embossing tools I got at Michaels or Hobby Lobby or some such) but dotting tools are widely available online or at Sally's. Or you can get creative with things from the craft store like I did OR you can use things around the house like tooth pics, pins, bobby pins, pencils (sharpened) or whatever! To make the dots, just blob some polish from the brush onto something like a plastic lid or something non-absorbant. Use the dotting tool to tab in the blob (so scientific right!) and then dot on your nails. If it starts to get stringy just wipe the tool on a cloth or paper towel and have another go.
Sunday, October 5, 2014
Pipedream Polish watermarble plus video!
Hey guys! Here is my first all-nail watermarble with the Pipe Dream neons. Every one is going crazy for these polishes and so am I! haha!
For this look I used 3: All In (blue), Happy Hour (teal, bottle pictured) and VIP Pass (purple)
I got a huge air bubble that led to a white spot on my middle finger, which I filled in with a dot but I don't think it looked any better or worse :/
Since I have the new phone I've been dabbling a little in video tutorials. Dabbling only! They take a lot of extra time so I'm not sure how many I'll be able to do but they sure are fun! I could watch watermarble videos all day!
This is super fast sped up because Instagram only allows 15 seconds of video. Most of my videos will be like this at first, I surely don't have time to make 2 versions!
For this look I used 3: All In (blue), Happy Hour (teal, bottle pictured) and VIP Pass (purple)
I got a huge air bubble that led to a white spot on my middle finger, which I filled in with a dot but I don't think it looked any better or worse :/
watermarble! |
Indirect sunlight |
I just love them so much ;) |
Since I have the new phone I've been dabbling a little in video tutorials. Dabbling only! They take a lot of extra time so I'm not sure how many I'll be able to do but they sure are fun! I could watch watermarble videos all day!
This is super fast sped up because Instagram only allows 15 seconds of video. Most of my videos will be like this at first, I surely don't have time to make 2 versions!
Labels:
neon,
pipe dream polish,
pipedream,
video,
video tutorial,
watermarble
Saturday, October 4, 2014
31DC2014 Part 2: the styles!
Hey guys! This is a tad overdue but I needed to get it up! This is the second part of the challenge. I even tried to keep it simple and I still got burnt out! If yall want to know any of the polishes used just ask in the comments!
I'll put the promt in the photo caption. Some of these yall already saw in the Pipe Dream post from Thursday. I just can not (and could not when I did these) blog every day so that's why these are grouped together!
"dots" |
"stripes" |
"animal print" |
"floral" |
"delicate print" |
"geometric" |
"glitter" |
"half moons" |
"galaxy" |
"watermarble" |
Subscribe to:
Posts (Atom)